

Stone Veneer Around Windows and Doors: Builder Guide
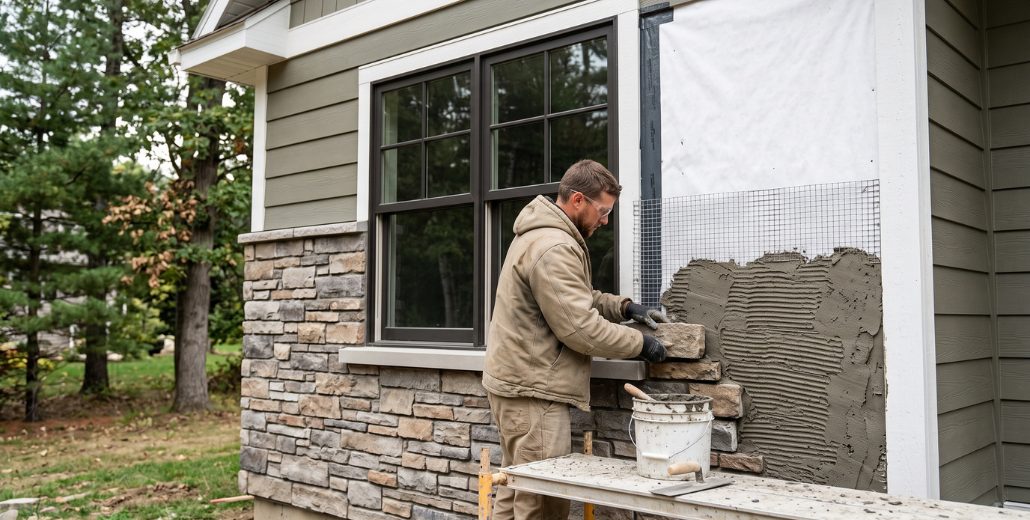
Manufactured stone veneer around windows and doors is not only a finish detail. It is also a water-management and sequencing detail.
The stone has to meet the opening cleanly, but the wall behind it also needs properly integrated flashing, a compatible water-resistive barrier, appropriate sealant joints, and enough room for the selected veneer and trim.
For builders and contractors, these decisions are easiest to resolve before the stone installer arrives. If window flashing, trim depth, WRB transitions, or opening dimensions are already fixed without considering the veneer system, the job can become harder to detail cleanly.
Key Takeaways / Summary
- Windows and doors interrupt the drainage path. Flashing and the water-resistive barrier need to direct water back to the exterior around those openings.
- Stone thickness affects the finished opening. Jamb depth, sill projection, trim, casing beads, and sealant joints should be coordinated before installation.
- Do not treat mortar as the only weather seal. Exterior openings depend on the wall assembly behind the veneer as well as the visible finish.
- Different materials need an appropriate transition joint. Window frames, door frames, trim, and stone should be detailed according to the approved wall system rather than simply locked together with mortar.
- Resolve the details before masonry starts. Product submittals, opening details, flashing, WRB, trim, and sequencing should be confirmed while changes are still practical.
Why Windows and Doors Need Special Attention
Exterior manufactured stone veneer is part of a wall assembly. Rain that reaches the veneer or mortar joints has to be managed by the drainage components behind and around the finish.
Windows and doors interrupt that drainage path.
The Concrete Masonry & Hardscapes Association states in its manufactured stone veneer installation checkpoints that the water-resistive barrier should be integrated with flashing accessories, doors, windows, penetrations, and cladding transitions.
That makes the opening detail a coordination item between trades, not something that should be left entirely to the mason after the window or door has already been installed.
Start With the Approved Wall Assembly
Before construction reaches the stone installation stage, identify the exact veneer system and wall backup.
A light-frame exterior may involve sheathing, water-resistive layers, lath or another approved substrate, mortar, and adhered manufactured stone veneer. Other systems may use cement board, drainage products, continuous insulation, or manufacturer-specific assemblies.
CMHA's current Manufactured Stone Veneer Installation Guide includes separate details for different wall conditions and building-code editions.
Practical tip: Put the veneer manufacturer, wall assembly, WRB system, and opening details into the current project record before the rough openings are finished.
Coordinate Flashing With the WRB
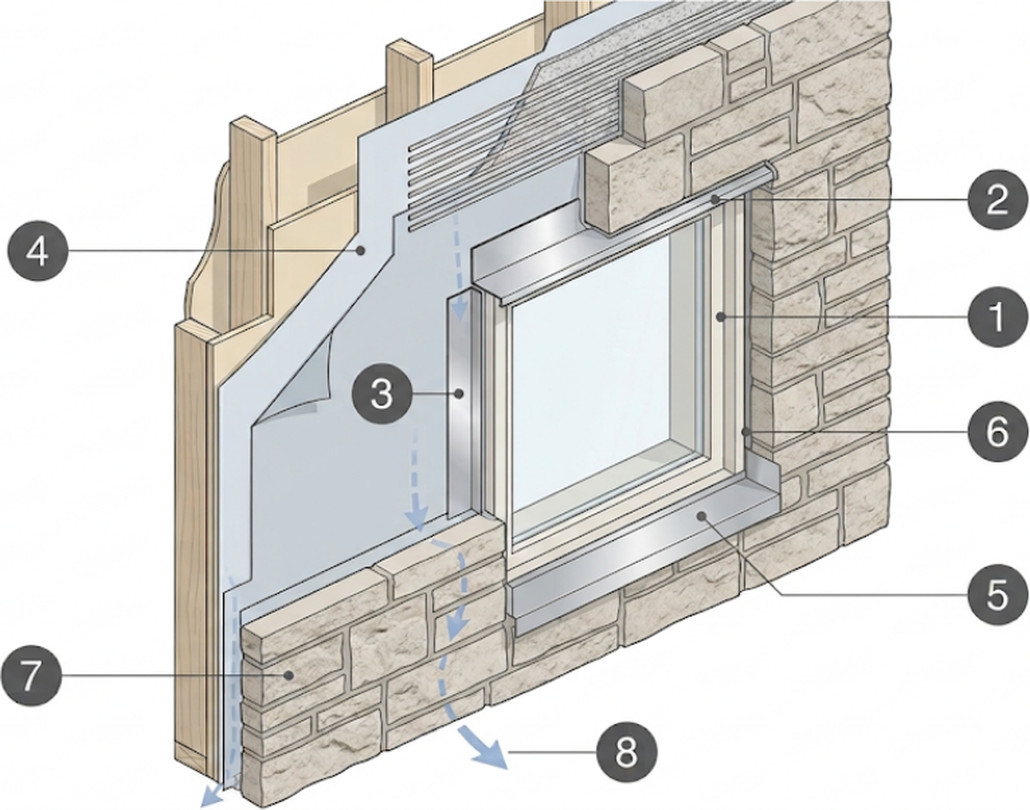
- Window frame
- Head flashing
- Jamb flashing
- Water-resistive barrier system
- Sill flashing / sill pan
- Flexible sealant joint
- Manufactured stone veneer assembly
- Drainage path
Flashing only works when water can reach it and then drain to the exterior.
CMHA's guide specification calls for the WRB to integrate with flashing at doors, windows, penetrations, and cladding transitions. It also addresses flashings, weep screeds, and related accessories where the downward movement of moisture is interrupted.
Builders should confirm:
- Window and door flashing follows the opening manufacturer's requirements.
- The WRB laps with the flashing in the intended drainage direction.
- Head flashing is coordinated with the veneer termination.
- Sill conditions allow water to move outward rather than behind the stone.
- Adjacent siding or other cladding transitions continue the drainage plane.
A visually clean stone return cannot compensate for disconnected or improperly lapped flashing behind the wall.
Confirm the Finished Depth Around the Opening
The window or door may be installed correctly and still look awkward once the veneer is added if the finish depth was not considered.
Review the combined thickness of:
- The selected stone profile
- The mortar or setting system
- Lath, scratch coat, cement board, or drainage components where applicable
- Window or door trim
- Sills, headers, or manufactured accessories
The completed stone may project farther than siding or other finishes.
This can affect whether the project needs deeper trim, a stone return, sill piece, casing bead, or another approved termination detail.
Practical tip: Review a section through the window jamb before ordering exterior trim. A front elevation alone will not show the depth relationship.
Plan the Joint Between Stone and the Opening
Stone veneer, mortar, window frames, door frames, wood trim, and metal components can move differently as temperature and moisture conditions change.
CMHA's manufactured stone veneer guide specification calls for flexible sealants around windows and doors and for control joints to be installed where the drawings show them and finished with flexible sealant.
The exact joint width, backing material, sealant, and location should follow project documents, manufacturer instructions, and the approved wall detail.
Do not assume that filling every transition tightly with mortar creates the best long-term joint.
Keep Window and Door Drainage Features Functional
Windows and doors may include sill pans, drainage paths, weeps, flashing flanges, or other features that need to remain functional after the stone is installed.
Before veneer reaches the opening, confirm:
- Which drainage components must remain open
- Where sealant is required
- Whether the sill has the required drainage direction
- How the veneer terminates below the frame
- How water is directed away at the head and jambs
If the window manufacturer's detail and the planned veneer detail do not align, resolve the conflict before installation begins.
Review Sills, Headers, and Returns Before Ordering
Openings can require special masonry pieces that affect both quantities and lead times.
Depending on the design, the project may need:
- Stone or manufactured sills
- Header pieces
- Corner units
- Jamb returns
- Casing beads
- Trim or accessory stones
VanderWall's manufactured stone options include flats and corner pieces that can be reviewed alongside the planned opening treatment.
Practical tip: Count outside corners and special opening conditions before releasing the order rather than treating every wall as flat square footage.
Coordinate Stone With Adjacent Siding
Windows and doors are often where several exterior materials meet.
A stone wainscot may end below a window while siding continues above it. Stone may wrap an entrance while siding meets the door trim. A garage opening may combine stone piers, trim, flashing, and siding within a small area.
VanderWall's guide to coordinating masonry with the rest of the home addresses the visual side of those transitions.
For construction, the builder should also confirm how the WRB, flashing, drainage, sealant, and finish terminations continue behind each material change.
Use the Submittal Process to Catch Problems Early
A stone color can be fully approved while the project still lacks a workable window or door detail.
Before releasing the masonry package, confirm:
- Exact manufacturer, profile, and accessories
- Approved wall assembly
- Opening flashing details
- WRB and drainage approach
- Trim depth
- Sealant joint details
- Sill and header materials
- Corner quantities
- Transitions to adjacent cladding
VanderWall's guide to material submittals for builders explains why product data, samples, accessories, approvals, and current project information should stay aligned before ordering.
Builder Checklist Before Stone Installation
- Confirm the stone system. Identify the manufacturer, profile, substrate, and installation method.
- Verify the openings. Check window and door frames, trim, sill conditions, and dimensions.
- Review flashing. Confirm sill, jamb, and head flashing coordinate with the WRB.
- Check wall depth. Make sure the finished veneer works with the opening projection and trim.
- Confirm drainage. Keep required water exits functional.
- Define transition joints. Do not leave stone-to-frame connections unresolved.
- Coordinate adjacent materials. Review stone-to-siding and stone-to-trim conditions.
- Approve special pieces. Confirm sills, corners, headers, and accessories before ordering.
- Review before installation. Resolve conflicting details before masonry covers the wall assembly.
Good Stone Details Begin Before the Stone Arrives
Windows and doors are some of the most visible areas on a stone exterior, but much of the work that determines long-term performance is hidden behind the veneer.
Flashing, WRB integration, drainage, sealant joints, trim depth, and opening dimensions should be coordinated before masonry begins.
When those details are resolved early, the mason can focus on clean cuts, consistent joints, and intentional transitions rather than solving wall-system conflicts in the field.
VanderWall Brothers supplies stone, brick, masonry materials, and project support for builders throughout West Michigan. Builders can send project details to the VanderWall team or visit the Spring Lake or Grand Rapids showroom to compare products, accessories, and samples before materials are released.
What we do
This is work we take on
Reading up is the first step. When you want it built, priced or supplied, these are the pages that cover it.
Keep reading
Everything To Know About CMU Blocks
CMU blocks, also known as concrete masonry units, are widely used building materials for commercial and residential…
Everything You Need to Know About Outdoor Fireplace Installation
Outdoor fireplaces and fire pits can transform your deck, patio, or yard into additional living areas, providing a cozy…
Popular Types of Outdoor Fireplaces
Do you want to elevate your outdoor entertaining space? One of the best ways to do that is by implementing an outdoor…
Thinking about a project like this?
Reading about it only gets you so far. Tell us the room and we will tell you what is possible in it.
Rather just ask someone?
Call the showroom. If it takes two minutes on the phone we would rather tell you than have you read around it.