
Can You Put an Outdoor Kitchen Under a Covered Patio?
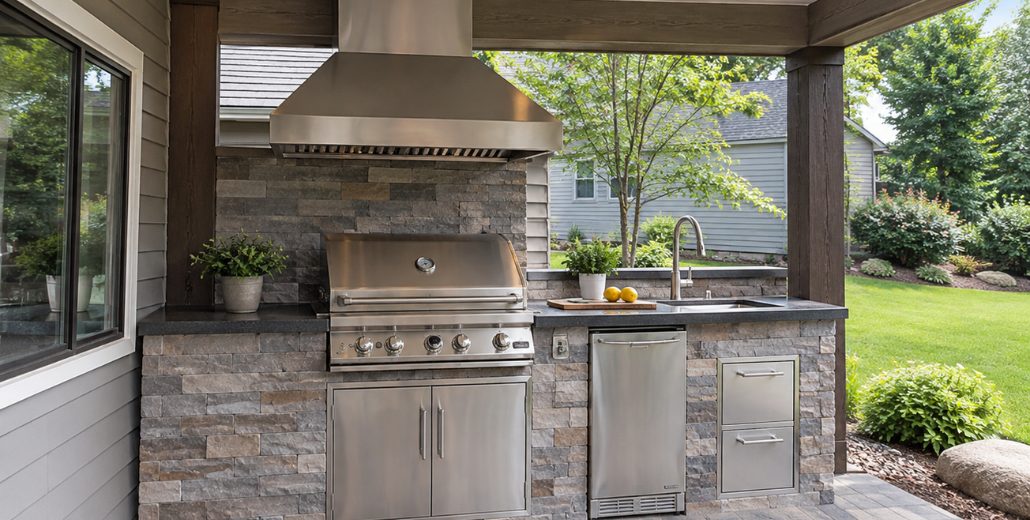
Yes, an outdoor kitchen can often be built under a covered patio, but adding a roof changes how the grill, ventilation, clearances, utilities, and surrounding materials need to be planned.
A grill that works well on an uncovered patio should not automatically be assumed to work in the same way beneath a roof or pergola.
The exact cooking appliance, overhead construction, wall layout, fuel type, and manufacturer requirements should be confirmed before the roof and kitchen are finalized.
Key Takeaways / Summary
- A covered outdoor kitchen is possible. The grill and roof need to be planned as one system rather than as separate projects.
- Overhead construction changes heat and smoke behavior. Some grill installations require or strongly benefit from an outdoor-rated exhaust hood.
- Clearances are appliance-specific. Do not use one universal distance for every grill, wall, ceiling, or combustible material.
- Island ventilation and overhead ventilation are different. Openings in a gas-grill enclosure address airflow within the island, while a hood manages heat, grease, and smoke above the cooking surface.
- Select the grill before finishing the roof and kitchen. Appliance specifications should guide the structure, utilities, ventilation, and surrounding materials.
A Covered Patio Changes the Cooking Environment
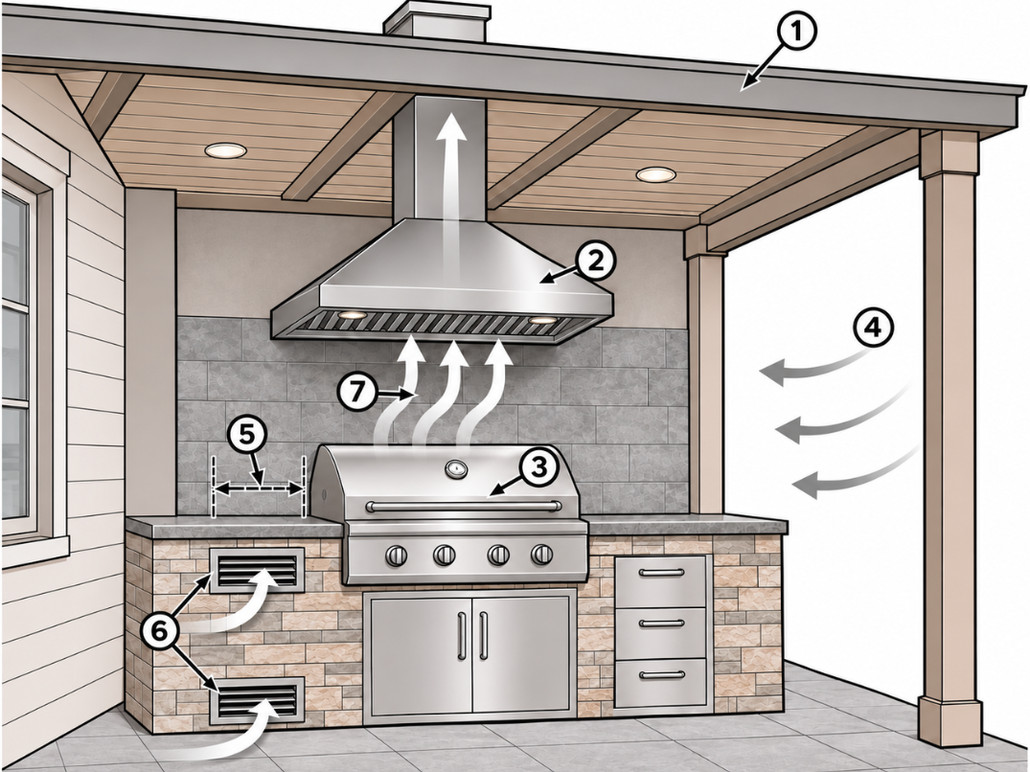
- Covered patio roof
- Outdoor-rated exhaust hood where required
- Built-in grill
- Open outdoor airflow
- Appliance-specific clearance zone
- Island ventilation openings
- Heat and smoke exhaust path
Outdoor cooking appliances release heat, smoke, grease, and combustion products into the surrounding space.
On a completely open patio, those products can disperse more freely. A roof changes the environment by limiting the upward path of heat and smoke.
Summerset's outdoor vent hood guidance explains that rooflines and pergolas can trap heat, smoke, and grease above outdoor grills, which is why covered cooking areas may need purpose-built ventilation.
That does not mean every patio roof uses the same hood or installation detail.
Practical tip: Identify the exact grill model before the patio ceiling, hood location, framing, or backsplash is finalized.
Start With the Grill Manufacturer's Requirements
The installation manual for the exact appliance should determine how the cooking area is built.
Manufacturers may specify requirements for:
- Overhead construction
- Combustible and noncombustible walls
- Rear and side clearances
- Insulating jackets
- Ventilation openings
- Exhaust hoods
- Gas supply
- Electrical connections
Those requirements can vary even between grill models from the same manufacturer.
VanderWall's guide to choosing appliances before outdoor kitchen construction explains why appliance specifications should be known before cabinetry, masonry openings, countertops, and utilities are finalized.
Does a Grill Under a Covered Patio Need a Vent Hood?
Sometimes, and the appliance instructions should make that determination.
Some outdoor grill manufacturers require an exhaust hood beneath certain combustible overhead construction and recommend one beneath some noncombustible covers.
An outdoor hood is designed to capture rising heat, smoke, and grease and move them away from the cooking area.
Outdoor hoods also need to be sized for the actual grill and installation. A residential indoor range hood should not automatically be treated as equivalent to an outdoor-rated system.
Practical tip: Treat the hood as part of the appliance package, not as a decorative accessory added after the patio roof is finished.
Island Ventilation Is a Separate Issue
A vent hood above the grill and ventilation openings in the kitchen island solve different problems.
The hood addresses rising heat and cooking exhaust.
Gas-grill enclosures may also require ventilation openings so replacement air can move through the island and gas cannot accumulate in an enclosed cavity if a leak occurs.
For example, current Summerset built-in grill instructions specifically include upper and lower island ventilation provisions for gas installations.
The exact number, size, and location of those openings depend on the appliance and manufacturer instructions.
Do not assume that installing a large hood above the grill eliminates the need for ventilation within the island itself.
A Covered Patio Should Still Function as an Outdoor Space
A roof does not automatically turn a patio into an enclosed room, but adding walls, screens, windows, or other barriers changes how air moves around the cooking area.
That is why the complete enclosure matters.
Review:
- How many sides remain permanently open
- Whether walls block prevailing airflow
- Whether screens or seasonal panels will be added later
- Where heat and smoke will travel
- Whether the grill sits against the house or an exterior wall
- How the manufacturer's definition of an outdoor installation applies
VanderWall's guide to how sun and wind affect outdoor living spaces explains why covered areas require their own airflow and weather review.
Coordinate the Roof Materials With the Grill
The ceiling and wall finishes around the grill matter because cooking appliances generate significant heat.
A covered kitchen may include:
- Wood framing
- Finished wood or composite ceilings
- Metal framing
- Masonry walls
- Stone veneer
- Brick
- Cementitious panels
Do not assume that placing a noncombustible finish over combustible construction automatically removes every clearance requirement.
The grill manufacturer's approved details should determine how the appliance relates to protected and unprotected construction.
Think About Grill Placement Before the Roof Is Built
The best location for the grill is not always the center of the covered space.
Consider:
- Prevailing wind
- Open sides of the patio
- Doors and windows
- Seating areas
- Roof beams and posts
- Hood duct routing
- Traffic behind the cook
Smoke should not be directed toward seating, open windows, or the main door into the house.
The grill lid also needs room to open without conflicting with the backsplash, hood, or nearby construction.
Plan Utilities Before Finishing the Ceiling and Patio
A covered outdoor kitchen can require several coordinated utilities.
Depending on the project, these may include:
- Natural gas or propane
- Electrical service
- Hood power
- Lighting
- Refrigeration
- Water
- Sink drainage
Hood ducting may also need a planned route through or around the patio structure.
Running those systems after the ceiling, masonry, and patio are finished can create avoidable rework.
Weather Protection Does Not Make Indoor Products Outdoor Products
A roof can reduce direct rain and snow, but wind-driven moisture, humidity, temperature changes, and outdoor exposure still affect appliances and cabinets.
Use products rated for their intended outdoor application.
VanderWall's current outdoor kitchen options include Stoll modular kitchen systems designed for outdoor use and capable of accommodating several types of cooking and refrigeration equipment.
The countertop, cabinetry, appliance, electrical components, and hood should each be suitable for the location where they will actually be installed.
Covered Outdoor Kitchen Planning Checklist
- Select the cooking appliances. Confirm the exact grill, burners, pizza oven, or other heat-producing equipment.
- Review manufacturer instructions. Check overhead, side, rear, enclosure, and ventilation requirements.
- Define the roof. Identify framing and finish materials before appliance placement is locked.
- Determine hood requirements. Coordinate an outdoor-rated solution where the appliance and project conditions require it.
- Plan island ventilation. Do not confuse cabinet ventilation with overhead exhaust.
- Review openness. Consider walls, screens, doors, and future enclosure changes.
- Coordinate utilities. Plan gas, electrical, water, drainage, lighting, and hood power before finishes.
- Check circulation. Keep the cooking zone clear of doors, seating, and main walking paths.
- Confirm outdoor-rated products. Select cabinets, countertops, appliances, and electrical components suited to the exposure.
Plan the Roof and Kitchen Together
A covered outdoor kitchen can create a comfortable cooking and entertaining area with better protection from sun and changing West Michigan weather.
But the roof should not be treated as an independent feature placed over a kitchen that was already designed.
The grill, overhead construction, ventilation, island, utilities, walls, and finish materials should be coordinated around the requirements of the actual products.
VanderWall Brothers works with outdoor kitchens, grills, masonry, pavers, heaters, and other outdoor-living products throughout West Michigan.
If you are planning an outdoor kitchen beneath a roof, pavilion, or covered patio, talk with the VanderWall team. Bring your patio plans, photos, and the appliances you are considering so the complete cooking area can be reviewed before construction is finalized.
What we do
This is work we take on
Reading up is the first step. When you want it built, priced or supplied, these are the pages that cover it.
Keep reading
Gather ‘Round the Fire to Experience Hygge
As winter sets in and the days get shorter, it’s time to embrace the Danish concept of hygge (pronounced hoo-gah). What…
Practice Fireplace Safety to Enjoy a Cozy Winter
Cozy season is officially here, and that means it’s time to make sure your fireplace is in safe operating condition. By…
How to Create a Cozy Outdoor Space for Fall
Temperatures are dropping, leaves are turning, and the sun is setting earlier. After a hectic summer, fall is the…
Thinking about a project like this?
Reading about it only gets you so far. Tell us the room and we will tell you what is possible in it.
Rather just ask someone?
Call the showroom. If it takes two minutes on the phone we would rather tell you than have you read around it.