


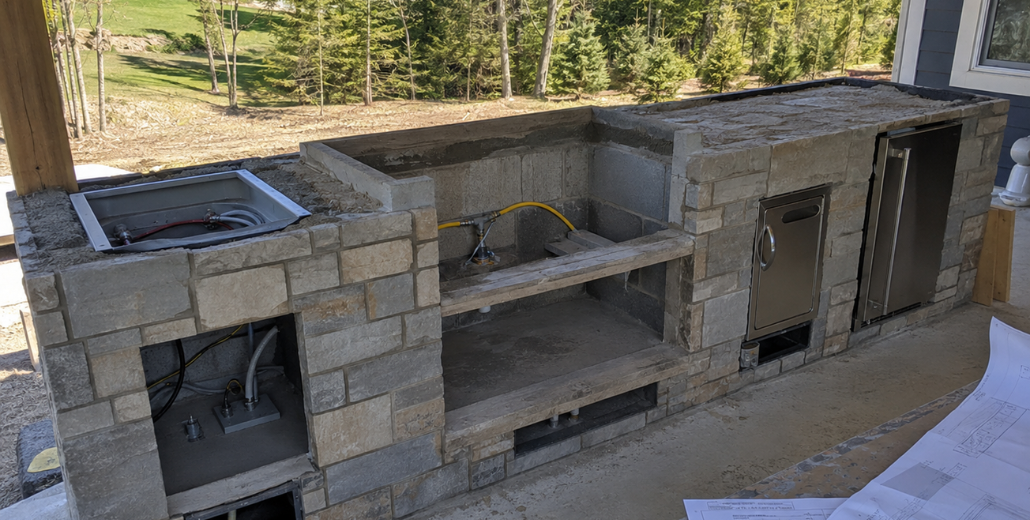
Choosing Appliances Before Outdoor Kitchen Masonry
An outdoor kitchen may appear to begin with masonry, cabinets, or a countertop.
In practice, the construction plan often begins with the appliances.
The exact grill, side burner, refrigerator, sink, pizza oven, smoker, or storage component can determine the dimensions of the island, the size of each opening, the location of utilities, the ventilation plan, and where access doors need to be installed.
When those products remain unconfirmed, the mason and builder may be asked to construct around assumptions.
For builders and contractors planning outdoor kitchen appliances and outdoor living products, reviewing the complete specifications before masonry begins can help reduce field changes and create a clearer installation process.
Appliance Specifications Are Construction Information
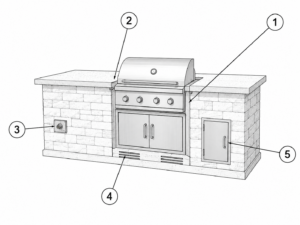
Legend:
- Masonry opening
- Countertop cutout
- Utility location
- Ventilation
- Service access
Outdoor kitchen appliances should not be treated as finish selections that can be resolved after the island has been built.
They provide construction information.
An appliance specification may determine:
- The width, depth, and height of the masonry opening
- The required countertop cutout
- The distance behind the appliance
- Gas or electrical connection locations
- Ventilation requirements
- Clearances from combustible materials
- The need for an insulated liner
- Access for shutoffs, outlets, drains, and service
- The position of doors, drawers, and adjacent appliances
Each of these decisions can affect more than one trade.
The builder, mason, electrician, gas professional, plumber, countertop fabricator, appliance installer, and landscape contractor may all need information from the same appliance documents.
Confirm the Exact Manufacturer and Model
Knowing that the outdoor kitchen will include a 36-inch grill is not enough.
Two grills described as the same general width may have different:
- Overall dimensions
- Cutout dimensions
- Control-panel depths
- Rear clearances
- Gas-entry locations
- Electrical requirements
- Ventilation instructions
- Insulating-liner requirements
The project team should confirm the manufacturer, exact model number, fuel type, accessories, and current installation instructions.
Builders should also verify that the specification sheet matches the product that has actually been ordered.
A preliminary brochure or website dimension may not contain every construction requirement found in the complete installation manual.
Cutout Dimensions Must Follow the Exact Model
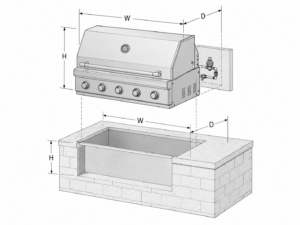
The appliance’s overall dimensions and its required cutout dimensions are not always the same.
A grill may extend over the countertop, sit on supporting flanges, require space behind the opening, or need an insulated liner that changes the final masonry dimensions.
The mason and countertop fabricator should review:
- Cutout width
- Cutout depth
- Cutout height
- Supporting ledges or flanges
- Corner radius requirements
- Rear clearances
- Countertop overhangs
- Required liners or sleeves
Official model-specific grill cutout dimensions demonstrate how the required opening changes from one built-in grill model to another.
The safest approach is to build from the current manual for the exact appliance rather than using a standard opening based on nominal grill width.
The Countertop Opening Must Match the Appliance Support
Outdoor appliances do not all rest on the countertop in the same way.
Some grills and side burners use supporting flanges. Other products may sit within a liner, sleeve, cabinet, or specifically formed opening.
The countertop fabricator may need to confirm:
- The finished opening dimensions
- The material thickness
- How the appliance is supported
- Required clearances around hot surfaces
- Whether the opening needs reinforcement
- The distance from the front edge
- The relationship to the masonry below
- Whether seams can be placed near the appliance
The countertop template should be based on approved construction dimensions, not only a conceptual drawing.
If the appliance changes after templating, the opening may no longer fit the selected product.
Combustible and Noncombustible Construction Require Different Planning
The material surrounding a grill affects how the appliance can be installed.
Masonry, concrete, and certain metal systems may be considered noncombustible when used appropriately. Wood framing, composite materials, and other combustible construction may require additional protection.
Some built-in appliances require an approved insulating liner when installed within a combustible enclosure.
The liner may change:
- The required cutout dimensions
- The amount of support beneath the appliance
- The clearances around the grill
- The construction of the island
- The relationship between the grill and countertop
Manufacturer instructions should be reviewed before the island is framed or built.
Builders should not assume that adding a heat-resistant finish to combustible framing creates the same condition as a properly designed noncombustible enclosure.
Ventilation Is Part of the Island Design
A built-in gas appliance may require ventilation openings within the enclosure.
These openings help address heat and the possible accumulation of unburned gas within the island.
The location and amount of ventilation may depend on:
- The appliance model
- The fuel type
- The size and shape of the enclosure
- Whether the island contains separate internal compartments
- Whether a propane cylinder is stored inside
- Other appliances within the same structure
Natural gas and propane do not behave in the same way inside an enclosure. Manufacturer instructions may therefore place ventilation at different heights depending on the fuel system.
Official built-in outdoor grill installation instructions provide model-specific requirements for enclosure openings, clearances, and installation planning.
Ventilation should be shown on the masonry drawing before construction starts.
Access and Ventilation Must Be Built Into the Island
The completed island needs more than appliance openings.
Builders should also provide access to the systems that may need inspection, connection, adjustment, or service.
Access may be needed for:
- Gas shutoff valves
- Flexible gas connections
- Pressure regulators
- Electrical outlets
- Transformers or ignition components
- Water shutoffs
- Drain connections
- Appliance fasteners
- Refrigerator plugs
- Future servicing
An access door should be large enough and positioned so that the required component can actually be reached.
A door installed for appearance but separated from the utility by a masonry wall or another appliance may not provide useful access.
The island’s ventilation openings must also remain unobstructed after shelves, drawers, trash bins, and stored items are added.
Gas Connections Should Be Coordinated With Access
The gas line should enter the island where it can connect to the selected appliance without interfering with drawers, doors, ventilation, or structural supports.
Builders should confirm:
- Natural gas or propane
- Required supply capacity
- Regulator requirements
- Connection size and location
- Shutoff-valve location
- Access after installation
- Protection from heat and physical damage
- Whether multiple appliances share the supply
A grill, side burner, pizza oven, and fire feature may each have separate fuel requirements.
The gas system should be reviewed by a qualified professional using the approved appliance information and applicable local requirements.
The appliance opening should not be completed before the team understands how the gas connection will reach the product.
Electrical Requirements Should Be Identified Early
Not every gas appliance operates without electricity.
Built-in grills may use electrical power for ignition, interior lights, rotisserie systems, controls, or accessories. Refrigerators, ice makers, lighting, heaters, and powered ventilation systems add further electrical requirements.
The electrical plan should identify:
- Required voltage
- Outlet location
- Circuit requirements
- Weather protection
- Ground-fault protection where required
- Access to the plug or connection
- Routing through the masonry structure
- Separation from heat and water
Placing an outlet somewhere inside the island does not guarantee that the appliance cord can reach it or remain accessible.
The outlet location should be coordinated with the exact appliance and the planned access opening.
Refrigeration Needs More Than an Empty Opening
An outdoor refrigerator opening should not be based only on the product’s front width.
The project team may need to consider:
- Overall appliance dimensions
- Required ventilation space
- Door swing
- Handle projection
- Electrical access
- Leveling clearance
- Drainage or condensation considerations
- Whether the appliance is front-venting
- Removal for future service
A refrigerator that fits tightly into the opening may still be difficult to ventilate, level, connect, or remove.
The surrounding masonry, countertop, and adjacent doors should allow the appliance to operate and be serviced according to its instructions.
Side Burners and Specialty Appliances Need Their Own Openings
Side burners, power burners, flat-top grills, pizza ovens, warming drawers, smokers, ice makers, and beverage systems each create different construction needs.
A side burner may require:
- A separate countertop cutout
- Gas or electrical service
- Ventilation beneath the unit
- Clearance around the lid
- Space for pots and handles
- Access to connections
A ceramic smoker may require a lower platform and clearance around the lid.
A pizza oven may affect countertop depth, heat clearance, and the strength of the supporting base.
Builders should avoid treating specialty appliances as interchangeable countertop inserts.
Sinks Add Water, Drainage, and Winter Planning
An outdoor sink changes the project from a cooking island into a plumbing project.
The plan may need to account for:
- Water-supply routing
- Shutoff access
- Drainage
- Sink-bowl depth
- Faucet height
- Countertop cutout
- Winterization
- Protection from freezing conditions
- Access for maintenance
The sink and faucet should be selected before the countertop is fabricated.
The cabinet or masonry area below should also provide enough space for plumbing without blocking storage, ventilation, or access to another appliance.
Appliance Doors and Lids Need Room to Move
Product specifications should be reviewed in both the closed and open positions.
A grill lid may project backward or upward when opened. Refrigerator doors, drawers, trash units, and access doors may interfere with adjacent walls, handles, steps, or seating.
The layout should account for:
- Open grill-lid height
- Door-swing direction
- Drawer extension
- Handle projection
- Walking space in front of the appliance
- Adjacent countertops and walls
- Space needed to remove internal components
A product can fit within its cutout and still be difficult to use if the surrounding clearances were not planned.
Overhead Construction May Affect Ventilation Planning
Outdoor kitchens are sometimes located beneath roofs, pergolas, porches, or other overhead structures.
The appliance manufacturer may require specific clearances or additional ventilation when a grill is installed beneath construction.
Builders should review:
- Whether overhead construction is combustible
- The vertical clearance above the cooking surface
- Whether a vent hood is required
- The hood size and airflow requirements
- Duct and discharge locations
- Access for cleaning and service
- The relationship to roof framing and finishes
The hood and grill should be coordinated as a system.
Adding a hood after the masonry and roof are complete can create conflicts with framing, ductwork, electrical service, and the finished design.
Masonry Thickness Changes the Finished Opening
The structural opening and the visible finished opening may not be identical.
Brick, stone veneer, tile, mortar, backer materials, waterproofing, and trim can reduce or change the opening after the base structure has been built.
The masonry drawing should account for:
- Structural wall thickness
- Stone or brick thickness
- Mortar joints
- Backer or substrate
- Metal frames or liners
- Countertop thickness
- Finish transitions around doors and drawers
The mason should understand whether the specified cutout refers to the rough opening or the final finished opening.
Reviewing masonry tools and outdoor kitchen project supplies early can also help identify the products needed to complete the selected construction system.
Doors and Drawers Should Align With the Appliance Layout
Access doors and storage components contribute to both function and appearance.
Their locations should respond to the appliances above and the utilities behind them.
Builders should review:
- Whether an access door aligns with the grill connections
- Whether drawers interfere with the gas line
- Whether a trash drawer blocks ventilation
- Whether door handles collide at corners
- Whether storage remains usable after utilities are installed
- Whether the opening dimensions match the exact product
Manufacturer instructions for doors and drawers often provide separate model-specific cutout dimensions.
One standard masonry opening should not be assumed to fit every access component.
Appliance Relationships Matter as Much as Individual Dimensions
Each appliance may fit correctly by itself and still create a poor overall arrangement.
The layout should consider the relationship between:
- The grill and preparation counter
- The grill and refrigerator
- The sink and food-preparation area
- Hot appliances and cold storage
- Cooking equipment and guest seating
- Appliance doors and walking paths
- The outdoor kitchen and the home entrance
Enough separation should be provided to use each component comfortably without making the island unnecessarily large.
Outdoor kitchen planning should combine product requirements with everyday movement and cooking habits.
Product Changes Can Require More Than a New Cutout
Changing an appliance after masonry has started can affect several completed decisions.
A replacement product may change:
- The opening size
- The required liner
- The gas-entry location
- The electrical outlet position
- Ventilation openings
- Countertop fabrication
- Door and drawer alignment
- Clearances from nearby surfaces
- The construction schedule
A substitution should therefore be reviewed by the full project team before it is approved.
The new product should not be treated as interchangeable only because it has a similar advertised width.
Create One Approved Appliance Specification Package
The project team should maintain one current collection of appliance information.
The package may include:
- Manufacturer and model number
- Product data sheet
- Installation manual
- Cutout dimensions
- Overall dimensions
- Fuel type
- Electrical requirements
- Ventilation requirements
- Clearance information
- Insulating-liner details
- Accessory list
- Finish selection
- Approved layout drawing
- Order and delivery status
The builder, mason, utility trades, countertop fabricator, and installer should work from the same approved information.
If a product changes, the package and affected drawings should be updated before construction continues.
Use a Dimensioned Elevation Before Masonry Begins
A basic floor plan may show where the island is located, but it may not communicate the vertical relationship between appliances, countertops, doors, ventilation, and masonry finishes.
A dimensioned elevation can show:
- Finished island height
- Countertop thickness
- Grill-opening height
- Door and drawer positions
- Ventilation openings
- Utility access
- Stone or brick transitions
- Appliance spacing
Separate elevations may be needed for each side of an L-shaped or U-shaped kitchen.
This drawing does not need to be visually elaborate. It needs to provide enough information for each trade to understand the finished arrangement.
Compare Appliances Before Construction Information Is Finalized
Seeing outdoor appliances in person can help builders and homeowners understand details that may not be clear in photographs.
These may include:
- Control-panel depth
- Grill-lid movement
- Handle projection
- Door and drawer operation
- Interior cooking space
- Material quality
- Access requirements
- Overall scale
Builders can encourage homeowners to compare outdoor kitchen products in person before appliance dimensions are released for masonry and countertop work.
VanderWall’s outdoor kitchen options can accommodate grills, refrigerators, kegerators, flat-top grills, pizza ovens, ice chests, side burners, sinks, smokers, and other components.
Custom and prefabricated systems can also be designed around selected appliance types and dimensions.
Questions to Confirm Before Releasing Masonry
Before masonry begins, the builder should be able to answer the following questions:
- Are all major appliances selected?
- Are the exact model numbers confirmed?
- Do we have the current installation manuals?
- Are the cutout dimensions approved?
- Does the island use combustible or noncombustible construction?
- Is an insulating liner required?
- Where will gas, electrical, water, and drainage enter?
- Can all connections and shutoffs be accessed?
- Where will enclosure ventilation be located?
- Will shelves or storage obstruct ventilation?
- Do doors, drawers, lids, and handles have room to open?
- Does the countertop fabricator have the same dimensions?
- Has overhead construction been reviewed?
- Do the masonry finishes change the final opening size?
- Has the complete layout been approved in writing?
If several of these questions remain unresolved, the masonry release may be premature.
How VanderWall Supports Outdoor Kitchen Coordination
Outdoor kitchens combine appliances, utilities, masonry, countertops, storage, hardscapes, and everyday movement.
Builders and homeowners often need help comparing the products before construction details are finalized.
VanderWall Brothers provides grills, smokers, pizza ovens, outdoor kitchens, fire features, masonry materials, and related outdoor living products.
Through outdoor kitchen support throughout West Michigan, the team can help clients review available products, compare dimensions, and understand which information should be shared with the project team.
That early clarity can give builders, masons, and fabricators a more reliable foundation for their work.
The Appliance Plan Comes Before the Masonry Plan
Masonry gives an outdoor kitchen its structure and finished character.
Appliance specifications determine much of what that structure needs to provide.
The exact models affect openings, countertops, utilities, ventilation, clearances, access, and future service.
When those requirements are reviewed before construction, the island can be built around confirmed information rather than adjusted around late decisions.
The goal is not simply to make the appliance fit.
It is to create an outdoor kitchen where the appliances, masonry, utilities, and surrounding space work together from the beginning.
Related Articles
- Outdoor Kitchen Planning Tips for Builders
- How Early Material Decisions Help Builders Protect the Project Schedule
- How to Make Outdoor Living Space Feel Connected to Your Home
- What to Know About Patio Drainage Before Choosing Pavers
If you are coordinating appliances, masonry, utilities, or countertops for an upcoming outdoor kitchen, talk with the VanderWall team. Call (616) 842-4500 or visit www.vanderwallbros.com.

Leave a Reply
Want to join the discussion?Feel free to contribute!